🚁 CDFL - Class D Fixed Line
Class D Fixed Line helicopter rescue operations - procedures, equipment, and communication systems for helicopter-based search and rescue missions.
Quick Reference - Pre-Flight Checklist
Reference Checklist
- Record required timings of aircraft departure, landings, and other key milestones
- Confirm BCEHS handoff location has been arranged
- Confirm coordinates with rescue site and BCEHS handoff location
- Turn on InReach and CalTopo tracking
- Notify SARM that tracking is on
- Confirm radio frequency with aircraft
- Perform radio check with aircraft
- Have impedance adapters ready to go on ICS
- Check AA batteries in headsets
- Set NIB to PTT
- Ask pilot if they want you to manage the rope as they land
- Debrief with pilot
Equipment Checklists
CDFL Operations Equipment
| Item | Required | Notes |
|---|---|---|
| Full Body Vacuum Splint | ✓ Required | Check for leaks, ensure pump included |
| First Aid Bag | ✓ Required | Check expiry dates, ensure fully stocked |
| 24-Hour Bag | ✓ Required | Contains dog harness and extra lanyards |
| Rope Kit | ⚠ As Required | Based on terrain and mission requirements |
| Winter Kit | ⚠ As Required | Based on weather conditions |
Hoist Operations Equipment
| Item | Required | Notes |
|---|---|---|
| First Aid Bag | ✓ Required | Check expiry dates, ensure fully stocked |
| 24-Hour Bag | ✓ Required | Contains dog harness and extra lanyards |
| Rope Kit | ⚠ As Required | Based on terrain and mission requirements |
| Winter Kit | ⚠ As Required | Based on weather conditions |
Note: Dog harness and extra lanyards are located in the 24-hour bag.
CDFL Setup Process
Step-by-Step Setup Procedure
| Step | Action | Responsibility |
|---|---|---|
| 1 | Recce Flight | Pilot conducts reconnaissance of area |
| 2 | Land at Staging Area | Pilot lands helicopter at designated staging location |
| 3 | Remove Doors | Pilot removes helicopter doors |
| 4 | Rig Belly Band | Crew rigs belly band to helicopter |
| 5 | Rig Y-Lanyard | Crew rigs Y-lanyard system |
| 6 | Flake Out Rope | Pilot decides length and number of accessory lines to add; crew flakes out rope |
| 7 | Remove Seat Cushions and Life Jackets | Crew removes seat cushions and life jackets to create working space |
Important: All crew members should communicate clearly during setup. Pilot has final authority on rope length and accessory line configuration based on mission parameters and terrain.
CDFL Configuration Diagram
CDFL Insertion Procedures
Descent Protocol
- Starting at approximately 50' from ground, call out distance numbers: "50, 40, 30, 20, 15, 10, 5, 4, 3, 2, 1"
- This allows pilot to gauge speed of descent - focus on rate, not exact measurements
- Anticipate landing approaching - three point land to one knee is preferred
- If need to move, point and communicate direction to pilot
Post-Landing
- Disconnect from fixed line including all gear
- Radio pilot that the line is clear
- Move off landing site in case other members being inserted
- Secure all bags on scene
- Package subject as required and move to suitable extraction point if needed
Extraction Call-In
- Call aircraft back ONLY when 100% ready and everything double-checked
- Include: weights, hazards, and wind direction if possible
- Guide aircraft and fixed line as necessary
- Attach subject, bags, and rescuers as required
- Perform buddy check and fresh eyes safety check
- Radio pilot ready to lift off
Hoist Operations Procedures
Single Person Load - Aircraft to Ground
- Ensure safety retractor connected to spine side of carabiner at harness attachment point
- Remove seat belt, buckling behind you
- Slowly move to side door, seated with legs out on skid/step
- Hoist operator will attach hoist hook
- Allow hoist to take your weight and spin out of aircraft
- Ensure hoist has your weight at all times - no weight on foot or hands
- Hoist operator will put you to full stow, connect bags, and remove safety retractor
- Head nod of approval between you and hoist operator
- Once 15' from ground, start lower hand signal and move bag to side
- Get legs behind/under you
- Land with 3-point landing on one knee if possible, stop cable with hand signal
- Disconnect and hold hoist hook off to side while indicating raise hand signal
Single Person Load - Ground to Aircraft
- Ensure safety check completed on harness, gear attached below main carabiner
- Radio aircraft: weight, number of loads, hazards (unless already done)
- Reach for hook and give lower signal to hoist operator
- Stop hook with lower signal once at appropriate location
- Connect to hook, ensure no twists, receive safety check if possible
- Give raise hand signal, let hoist take your weight - do not stand, just let it pull you off ground
- 5-10 feet before skid, move bag from between legs to side facing aircraft
- Do not climb onto aircraft or bear weight to skids
- Allow hoist to reach full stow position
- Hoist operator will attach safety retractor and handle bags
- May need to assist with gear carabiner removal
- Maintain 3 points of contact minimum as hoist lowers you to skid
- Slowly climb into farthest seat and buckle up
- If changing retractors: put new retractor on BEFORE removing previous one
Double Person Load (Double Up)
- Two members each with bag attached same as single
- One hand signals, one reaches for hook
- Both attach to hoist hook - ensure gates are opposing
- 5-10 feet before skids, get bags sorted and ready to pass to hoist operator
- No weight on machine, hook in full stow
- Hoist operator to attach safety retractor to each person, spine side of beaner
- Pass bags with positive control to hoist operator
- May have to disconnect gear beaner - ensure communication with hoist operator
- Watch footing, ensure minimum 3 points of contact
- Progress inside to farthest seat, buckle up
1 Attendant with Screamer Suit
- Place subject in screamer suit - metal loops on outside, fabric center section in middle
- Ensure spine side of carabiner will face aircraft
- Subject in seated position if possible
- Attach your beaner to gate side bottom of screamer suit beaner
- Call in helicopter with combined weight of subject and gear
- Connect hook to screamer suit carabiner, safety checked if possible
- Once hook in full stow, receive safety retractor and attach to spin side of beaner
- Hoist operator will attach safety retractor to screamer suit beaner
- Get 3 points of contact, hand on pull strap, ready to be pulled in with subject
- Head nod to hoist operator when ready
- Hoist operator tells pilot to lower hoist
- Once in, get subject situated and you into seat
- May need to change safety retractors
Communication System Operation
Headset Setup Before Approaching Aircraft
- Install fresh batteries in headset
- Turn headset on by pressing forward button for 2 seconds
- Set NIB to PTT by double-tapping the NIB button to cycle through options
- Perform NIB and VHF radio check
NIB (Internal Intercom) Operation
NIB Functions:
- Acts as internal intercom for team communication
- Approximate range: 20 meters
- When set to NIB PTT, press and hold NIB PTT button to communicate
In-Aircraft Communication
- After buckling into aircraft, attach headset to impedance converter
- This matches microphone impedance to aircraft system
- Attach impedance converter to PTT in aircraft OR directly into ceiling jack
- Communicate as normal - like wearing provided aviation headsets
- Important: All members must be connected to aircraft comms
Disembarking for Operations
- Disconnect from impedance converter (can stay in aircraft)
- Connect headset to your PTT
- Ensure radio is ON
- Once outside aircraft, perform radio check on VHF to pilot
Operational Specifications
| Parameter | CDFL Operations | Hoist Operations |
|---|---|---|
| Weight Limit | 900-1100 lbs on fixed line | 450-600 lbs on hoist line |
| Max Distance | Determined by recce flight | Up to 350' off ground |
| Team Size | Varies by weight limit | 2-3 persons |
| Kit Types | Boost kit (no belly band) or Emergco (requires belly band + 2nd person) | Standard hoist configuration |
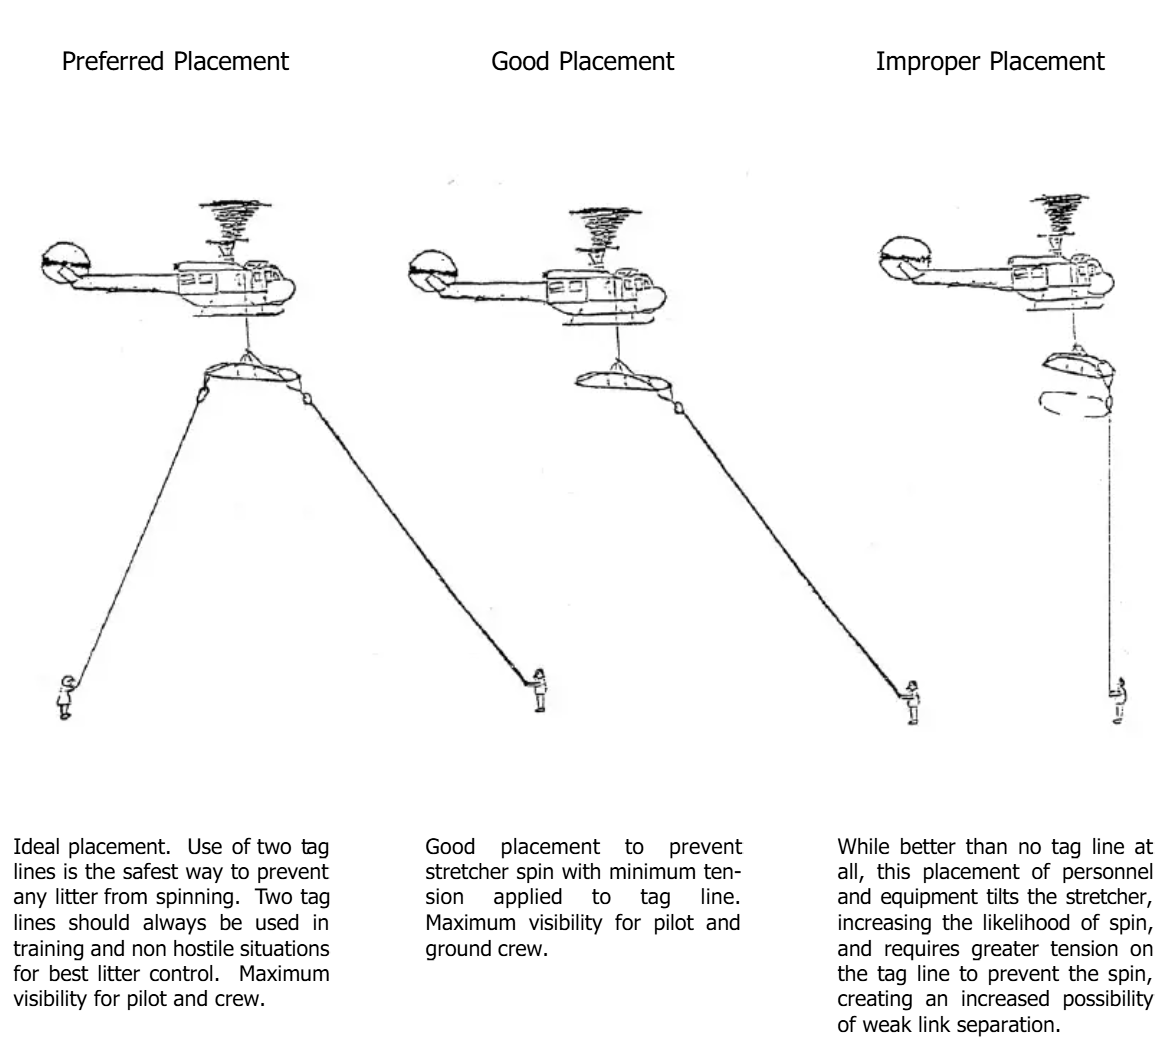
1 Attendant with ARP Procedures
Pre-Flight Setup
- Ensure ARP is loaded properly, no crosses, and ready for flight
- Carabiner is spine side to aircraft
- You are sitting on subject's left, with your right shoulder to their head
- Ensure 2 tag lines attached, and both operators holding on and ready to go
- Attach your beaner to the ARP beaner, gate side, below gate
- Once all are ready, call in aircraft as stated before
Hoist Procedure
- Raise hand to receive hook, signal as required
- Attach hoist hook to ARP beaner, and have safety checked by another
- Signal raise until 18"-24" off the ground
- Signal both tag liners to get into position, once there and received confirmation they are good to go, signal for raise
- Once at skids, remove both tag lines - Do not wait for hoist operator prompt
- Once at full stow, same process as screamer suit entry
- Once in aircraft, connect both top and bottom Dynema and carabiners to ARP
- Ensure always on retractor or buckled, may have to give retractor to hoist operator - if so, follow procedure above for changing retractors
Peltor Comtac 6 Headset Troubleshooting
| Problem | Possible Cause | Solution |
|---|---|---|
| No power | Dead batteries, poor connection | Replace batteries, check battery compartment contacts |
| No audio from radio | Cable disconnect, low volume | Check connections, increase volume on right ear cup |
| Cannot transmit | PTT not working, cable damage | Test PTT button, check cable integrity |
| Muffled audio | Poor seal, damaged ear cushions | Adjust headset fit, replace ear cushions |
| Feedback/static | Volume too high, interference | Lower volume, check for radio interference sources |